
Deep linking
In this guide we will set up our app to handle external URIs.
Deep-link integration
To handle incoming links, we need to handle 2 scenarios:
- If the app wasn't previously open, we need to set the initial state based on the link
- If the app was already open, we need to update the state to reflect the incoming link
To handle a deep link, we need to translate it to a valid navigation state. The library exports a getStateFromPath utility to convert a URL to a state object.
For example, the path /rooms/chat?user=jane will be translated to a state object like this:
{
  routes: [
    {
      name: 'rooms',
      state: {
        routes: [
          {
            name: 'chat',
            params: { user: 'jane' },
          },
        ],
      },
    },
  ],
}
The useLinking hook makes it easier to handle incoming links:
import { NavigationContainer, useLinking } from '@react-navigation/native';

function App() {
  const ref = React.useRef();

  const { getInitialState } = useLinking(ref, {
    prefixes: ['https://mychat.com', 'mychat://'],
  });

  const [isReady, setIsReady] = React.useState(false);
  const [initialState, setInitialState] = React.useState();

  React.useEffect(() => {
    Promise.race([
      getInitialState(),
      new Promise(resolve =>
        // Timeout in 150ms if `getInitialState` doesn't resolve
        // Workaround for https://github.com/facebook/react-native/issues/25675
        setTimeout(resolve, 150)
      )
    ])
      .catch(e => {
        console.error(e);
      })
      .then(state => {
        if (state !== undefined) {
          setInitialState(state);
        }

        setIsReady(true);
      });
  }, [getInitialState]);

  if (!isReady) {
    return null;
  }

  return (
    <NavigationContainer initialState={initialState} ref={ref}>
      {/* content */}
    </NavigationContainer>
  );
}
Note: The
getInitialStatefunction uses React Native'sLinking.getInitialUrl()under the hood. Currently there seems to be bug (facebook/react-native#25675) which results in it never resolving on Android.
Often, directly translating path segments to route names may not be the expected behavior. For example, you might want to parse the path /feed/latest to something like:
{
  routes: [
    {
      name: 'Chat',
      params: {
        sort: 'latest',
      },
    },
  ];
}
You can specify a separate config option to control how the deep link is parsed to suit your needs.
const { getInitialState } = useLinking(ref, {
  prefixes: ['https://mychat.com', 'mychat://'],
  config: {
    Chat: 'feed/:sort',
  },
});
Here Chat is the name of the screen that handles this URL. The navigator will need to have a Chat screen which handles a sort param for the route:
You can also customize how params are parsed, for example, if you parse the path /item/42 as item/:id, the param id will be parsed as string by default. But you can customize it by passing a function:
{
  Catalog: {
    path: 'item/:id',
    parse: {
      id: Number,
    },
  },
}
This will result in something like:
const state = {
  routes: [
    {
      name: 'Catalog',
      params: { id: 42 },
    },
  ],
};
It's important to note that the state object must match the hierarchy of nested navigators. Otherwise the state will be discarded.
Sometimes we'll have the target navigator nested in other navigators which aren't part of the deep link. For example, let's say our navigation structure looks this:
function Home() {
  return (
    <Tab.Navigator>
      <Tab.Screen name="Profile" component={Profile} />
      <Tab.Screen name="Notifications" component={Notifications} />
    </Tab.Navigator>
  );
}

function App() {
  return (
    <Stack.Navigator>
      <Stack.Screen name="Home" component={Home} />
      <Stack.Screen name="Settings" component={Settings} />
    </Stack.Navigator>
  );
}
Here we have a stack navigator in root, and inside the Home screen of the root stack, we have a tab navigator with various screens. With this structure, let's say we want the path /users/:id to go to the Profile screen. We can express the nested config like so:
{
  Home: {
    screens: {
      Profile: 'users/:id',
    },
  },
}
In this config, we specify that the Profile screen should be resolved for the users/:id pattern and it's nested inside the Home screen. Then parsing users/jane will result in the following state object:
const state = {
  routes: [
    {
      name: 'Home',
      state: {
        routes: [
          {
            name: 'Profile',
            params: { id: 'jane' },
          },
        ],
      },
    },
  ],
};
Sometimes we want to ensure that a certain screen will always be present for the navigator in the state object. We can achieve it by specifying the initialRouteName property for that navigator in the config. For the above example, if we want the Notifications screen to be the initial route in Home tab navigator, we should specify such config (Notifications screen needn't be mentioned in screens property):
{
  Home: {
    initialRouteName: 'Notifications',
    screens: {
      Profile: 'users/:id',
      Notifications: 'notify/:user',
    },
  },
};
Then, the path /users/42 will resolve to the following state object:
const state = {
  routes: [
    {
      name: 'Home',
      state: {
        index: 1,
        routes: [
          {
            name: 'Notifications',
          },
          {
            name: 'Profile',
            params: { id: 'jane' },
          },
        ],
      },
    },
  ],
};
Notice that we can't pass any params to the Notifications screen if it isn't explicitly mentioned in the URL string, so the screen should implement handling lack of these params with e.g. providing default ones.
For some advanced cases, specifying the mapping may not be sufficient. You can implement your custom parser to address these cases using the getStateFromPath option:
const { getInitialState } = useLinking(ref, {
  prefixes: ['https://mychat.com', 'mychat://'],
  config: {
    Chat: 'feed/:sort',
  },
  getStateFromPath: (path, options) => {
    // Implement your custom parser and return the navigation state here
  },
});
Set up with Expo projects
First, you will want to specify a URL scheme for your app. This corresponds to the string before :// in a URL, so if your scheme is mychat then a link to your app would be mychat://. The scheme only applies to standalone apps and you need to re-build the standalone app for the change to take effect. In the Expo client app you can deep link using exp://ADDRESS:PORT where ADDRESS is often 127.0.0.1 and PORT is often 19000 - the URL is printed when you run expo start. If you want to test with your custom scheme you will need to run expo build:ios -t simulator or expo build:android and install the resulting binaries in your emulators. You can register for a scheme in your app.json by adding a string under the scheme key:
{
  "expo": {
    "scheme": "mychat"
  }
}
URI Prefix
Next, let's configure our navigation container to extract the path from the app's incoming URI.
import { Linking } from 'expo';

const prefix = Linking.makeUrl('/');

function App() {
  const ref = React.useRef();

  const { getInitialState } = useLinking(ref, {
    prefixes: [prefix],
  });

  const [isReady, setIsReady] = React.useState(false);
  const [initialState, setInitialState] = React.useState();

  React.useEffect(() => {
    getInitialState()
      .catch(() => {})
      .then(state => {
        if (state !== undefined) {
          setInitialState(state);
        }

        setIsReady(true);
      });
  }, [getInitialState]);

  if (!isReady) {
    return null;
  }

  return (
    <NavigationContainer initialState={initialState} ref={ref}>
      {/* content */}
    </NavigationContainer>
  );
}
The reason that is necessary to use Expo.Linking.makeUrl is that the scheme will differ depending on whether you're in the client app or in a standalone app.
Test deep linking on iOS
To test the URI on the simulator in the Expo client app, run the following:
xcrun simctl openurl booted [ put your URI prefix in here ]

# for example

xcrun simctl openurl booted exp://127.0.0.1:19000/--/chat/jane
Test deep linking on Android
To test the intent handling in the Expo client app on Android, run the following:
adb shell am start -W -a android.intent.action.VIEW -d "[ put your URI prefix in here ]" host.exp.exponent

# for example

adb shell am start -W -a android.intent.action.VIEW -d "exp://127.0.0.1:19000/--/chat/jane" host.exp.exponent
Change host.exp.exponent to your app package name if you are testig on a standalone app.
Read the Expo linking guide for more information about how to configure linking in projects built with Expo.
Set up with react-native init projects
iOS
Let's configure the native iOS app to open based on the mychat:// URI scheme.
You'll need to link RCTLinking to your project by following the steps described here. To be able to listen to incoming app links, you'll need to add the following lines to SimpleApp/ios/SimpleApp/AppDelegate.m.
If you're targeting iOS 9.x or newer:
// Add the header at the top of the file:
#import <React/RCTLinkingManager.h>

// Add this above `@end`:
- (BOOL)application:(UIApplication *)application
   openURL:(NSURL *)url
   options:(NSDictionary<UIApplicationOpenURLOptionsKey,id> *)options
{
  return [RCTLinkingManager application:application openURL:url options:options];
}
If you're targeting iOS 8.x or older, you can use the following code instead:
// Add the header at the top of the file:
#import <React/RCTLinkingManager.h>

// Add this above `@end`:
- (BOOL)application:(UIApplication *)application openURL:(NSURL *)url
  sourceApplication:(NSString *)sourceApplication annotation:(id)annotation
{
  return [RCTLinkingManager application:application openURL:url
                      sourceApplication:sourceApplication annotation:annotation];
}
If your app is using Universal Links, you'll need to add the following code as well:
// Add this above `@end`:
- (BOOL)application:(UIApplication *)application continueUserActivity:(nonnull NSUserActivity *)userActivity
 restorationHandler:(nonnull void (^)(NSArray<id<UIUserActivityRestoring>> * _Nullable))restorationHandler
{
 return [RCTLinkingManager application:application
                  continueUserActivity:userActivity
                    restorationHandler:restorationHandler];
}
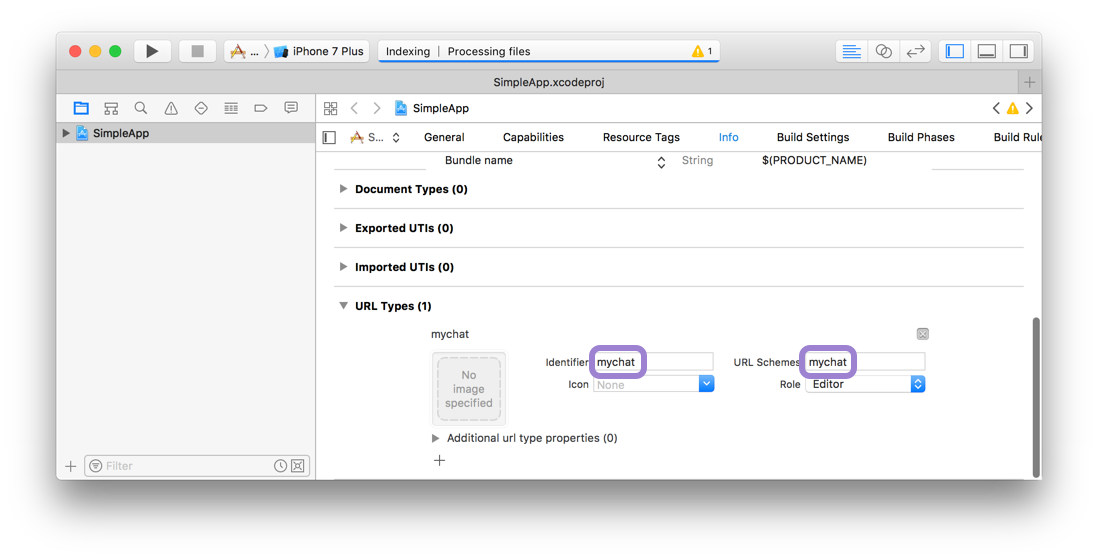
In Xcode, open the project at SimpleApp/ios/SimpleApp.xcodeproj. Select the project in sidebar and navigate to the info tab. Scroll down to "URL Types" and add one. In the new URL type, set the identifier and the URL scheme to your desired URL scheme.
Now you can press play in Xcode, or re-build on the command line:
react-native run-ios
To test the URI on the simulator, run the following:
xcrun simctl openurl booted mychat://chat/jane
To test the URI on a real device, open Safari and type mychat://chat/jane.
Android
To configure the external linking in Android, you can create a new intent in the manifest.
In SimpleApp/android/app/src/main/AndroidManifest.xml, do these following adjustments:
- Set
launchModeofMainActivitytosingleTaskin order to receive intent on existingMainActivity. It is useful if you want to perform navigation using deep link you have been registered - details - Add the new
intent-filterinside theMainActivityentry with aVIEWtype action:
<activity
    android:name=".MainActivity"
    android:launchMode="singleTask">
    <intent-filter>
        <action android:name="android.intent.action.MAIN" />
        <category android:name="android.intent.category.LAUNCHER" />
    </intent-filter>
    <intent-filter>
        <action android:name="android.intent.action.VIEW" />
        <category android:name="android.intent.category.DEFAULT" />
        <category android:name="android.intent.category.BROWSABLE" />
        <data android:scheme="mychat" />
    </intent-filter>
</activity>
Now, re-install the app:
react-native run-android
To test the intent handling in Android, run the following:
adb shell am start -W -a android.intent.action.VIEW -d "mychat://chat/jane" com.simpleapp
Hybrid iOS Applications (Skip for RN only projects)
If you're using React Navigation within a hybrid app - an iOS app that has both Swift/ObjC and React Native parts - you may be missing the RCTLinkingIOS subspec in your Podfile, which is installed by default in new RN projects. To add this, ensure your Podfile looks like the following:
 pod 'React', :path => '../node_modules/react-native', :subspecs => [
    . . . // other subspecs
    'RCTLinkingIOS',
    . . .
  ]